

Show hidden files, folders, and drives
To view files, folders, and drives that Windows hides, open the Windows search box (Windows Logo) and type folder. Next, select Folder Options from the search list and navigate to the View tab. Under Hidden files and folders, check the box next to "Show hidden files, folders, and drives."
Tips & Tricks
-
Gohel Manish

- Posts: 6503
- Joined: Fri Oct 23, 2020 10:32 am
- Has thanked: 366 times
- Been thanked: 1322 times
Re: Tips & Tricks
- No Card sharing discussion allowed on this forum.
- Note: Viewing Pay TV without a valid subscription is illegal.
- All the files available here are kept for experimental and educational purpose only.

- Note: Viewing Pay TV without a valid subscription is illegal.
- All the files available here are kept for experimental and educational purpose only.
-
Gohel Manish
- Posts: 6503
- Joined: Fri Oct 23, 2020 10:32 am
- Has thanked: 366 times
- Been thanked: 1322 times
Re: Tips & Tricks
To access blocked web page: Go to Google Translate, paste the URL, select source language as other language, select destination language as the web page’s language, click Translate. Free web proxy.
- No Card sharing discussion allowed on this forum.
- Note: Viewing Pay TV without a valid subscription is illegal.
- All the files available here are kept for experimental and educational purpose only.
- Note: Viewing Pay TV without a valid subscription is illegal.
- All the files available here are kept for experimental and educational purpose only.
-
Gohel Manish
- Posts: 6503
- Joined: Fri Oct 23, 2020 10:32 am
- Has thanked: 366 times
- Been thanked: 1322 times
Re: Tips & Tricks
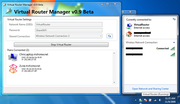
To boost your Wi-Fi signal:
Download
https://archive.codeplex.com/?p=virtualrouter
Virtual Router to turn your computer(s) into a Wi-Fi hotspot. It will extend the reach of your network.
Download
https://archive.codeplex.com/?p=virtualrouter
Virtual Router to turn your computer(s) into a Wi-Fi hotspot. It will extend the reach of your network.
- No Card sharing discussion allowed on this forum.
- Note: Viewing Pay TV without a valid subscription is illegal.
- All the files available here are kept for experimental and educational purpose only.
- Note: Viewing Pay TV without a valid subscription is illegal.
- All the files available here are kept for experimental and educational purpose only.
-
Gohel Manish
- Posts: 6503
- Joined: Fri Oct 23, 2020 10:32 am
- Has thanked: 366 times
- Been thanked: 1322 times
Re: Tips & Tricks
YouTube keyboard shortcuts

Your computer and programs running on your computer are not the only places keyboard shortcuts can be used. Many online services like YouTube also offer keyboard shortcuts. Below is a listing of keys you can use on your keyboard to control YouTube videos.
Note
The YouTube video and window must be active. If these keys are not working, click the video to make sure it is selected. Switching between windows, changing tabs in your browser, or performing other actions like making a comment unselects the video.
Play and pause a video
Press the spacebar or the K key on your keyboard to play and pause a video.
Tip
Holding down either of these keys also plays the video in slow motion.
Jump to start of a video
Pressing the 0 (zero) key on your keyboard will jump to the beginning of a video. The Home key also works for jumping to the start of a video.
Jump to the end of a video or go to the next video
Pressing the End key on your keyboard goes to the end of the video. If you are watching a playlist, it goes to the next video in the playlist.
Skip or jump in the video
Fast forward or rewind
If you want to fast forward or rewind in increments of five seconds, press the left or right arrow keys. If you need to jump more than five seconds, press the J key to rewind ten seconds or press the L key to fast forward 10 seconds.
Skip to video sections
Pressing the number keys from 1 to 9 seeks (jumps) to that percentage of the video. In other words, 1 jumps to 10%, 2 jumps to 20%, 3 jumps to 30%, etc.
Change video playback speed
To decrease the playback speed of a video, hold down the Shift and press the , (comma) key.
To increase the playback speed of a video, hold down the Shift and press the . (period) key.
Switch the video to full-screen or theater mode
Pressing the F key switches between full-screen and normal mode.
Tip
Pressing Esc also exits full-screen mode.
Pressing the T key switches between theater mode and normal mode.
Turn on or off closed captions and subtitles
If a video has closed captions or subtitles, you can turn them on by pressing the C key. Pressing C a second time turns them off again.
Turn up and down the volume
When in full-screen mode, pressing the up or down arrow keys turns up and down the volume of the video. If you are turning down the volume and continue to hold the down arrow key, it will eventually mute the volume.
Tip
Pressing M on the keyboard also mutes and unmutes the volume.
- No Card sharing discussion allowed on this forum.
- Note: Viewing Pay TV without a valid subscription is illegal.
- All the files available here are kept for experimental and educational purpose only.
- Note: Viewing Pay TV without a valid subscription is illegal.
- All the files available here are kept for experimental and educational purpose only.
-
Gohel Manish
- Posts: 6503
- Joined: Fri Oct 23, 2020 10:32 am
- Has thanked: 366 times
- Been thanked: 1322 times
Re: Tips & Tricks
Snap two windows side-by-side in Windows
Smart Window
Smart Window, also called Snap, is a feature of Microsoft Windows that lets you automatically position two windows side-by-side, without having to manually resize them. Smart Window is also useful if you don't want to use Alt+Tab to switch between 2 windows.
Tip
Smart Window was introduced in Windows 7, and is also available in Windows 8, 8.1, and 10. If you are running an earlier version of Windows, such as Windows XP or Windows Vista, see: Split and arrange open windows.
Enable Snap Windows in Windows settings.
Snap windows using the mouse.
Snap windows using the keyboard.
How to un-snap windows after snapping them.
Enable Snap Windows in Windows settings
If you're running Windows 8 or 10, first make sure the Snap Windows feature is enabled in the Settings.
Access the Settings by opening the Start menu and click the gear icon ⚙ on the left. Alternatively, hold down the Windows key and press I.
In the Settings menu, click System.
On the left, click Multitasking.
On the right, make sure Snap Windows is set to On.
Note
If you are running Windows 7, Smart Window is always turned on. If you want to disable it, you need to modify a key in the Windows registry. For more information, see: How to disable Smart Window in Windows 7.
Snap windows using the mouse
Follow these steps to snap windows using your mouse.
Click-and-drag on the top title bar of the first window, so your mouse pointer hits either the left or right side of your screen. Let go of the window when you see the outline of the window resize to half of the screen.
Choose the other window you want to view on the side of the first window. Click-and-drag the second window to the opposite side of the screen until the mouse pointer hits the side of the screen and resizes.
Snap windows using the keyboard
Follow these instructions to snap windows using your keyboard.
Press the Windows key and press either the Right or Left arrow key, moving the open window to either the screen's left or right position.
Choose the other window you want to view to the side of the window in step one. When using the Windows key for this step, as described in step one above, use the opposite (right or left) arrow button that you used in step one.
How to un-snap windows after snapping them
After you snap one or more windows, you can follow these steps to return them to a normal window view.
Click-and-drag the window, so the mouse pointer hits the top of the screen and let go to put the window back to regular size.
If you want to view a single window, click a blank spot at the top, and while holding the mouse button down, shake the window you want to view. The shaking action will minimize all other windows to the Taskbar. To re-open windows that were minimized, click and shake the window you're using.
Press the Windows key on your keyboard, and at the same time, press either the Up arrow or the Down arrow. The up arrow maximizes the window, and the down arrow will minimize the window.
- No Card sharing discussion allowed on this forum.
- Note: Viewing Pay TV without a valid subscription is illegal.
- All the files available here are kept for experimental and educational purpose only.
- Note: Viewing Pay TV without a valid subscription is illegal.
- All the files available here are kept for experimental and educational purpose only.
-
Gohel Manish
- Posts: 6503
- Joined: Fri Oct 23, 2020 10:32 am
- Has thanked: 366 times
- Been thanked: 1322 times
Re: Tips & Tricks
Enter the same text into multiple Excel cells at once
Same text into multiple excel cells
In Microsoft Excel, you can enter the same data or text into multiple cells at once using the below simple steps.
Highlight all the cells that you want to have the same text.
Type the text you want.
After typing the text, instead of pressing Enter, press Ctrl+Enter.
After completing the above steps, the text automatically is entered into all highlighted cells. This tip is useful if you have data with the same prefix and need to add something to the end of each cell.
For example, the above steps were done to enter "computer hope" in all the highlighted cells, as shown in the picture. Once completed, I could press F2 on a selected cell, go to the end, and add "1" to make the cell "computer hope 1". I could keep doing this for each cell to have computer hope 1 through 16.
- No Card sharing discussion allowed on this forum.
- Note: Viewing Pay TV without a valid subscription is illegal.
- All the files available here are kept for experimental and educational purpose only.
- Note: Viewing Pay TV without a valid subscription is illegal.
- All the files available here are kept for experimental and educational purpose only.
-
Gohel Manish
- Posts: 6503
- Joined: Fri Oct 23, 2020 10:32 am
- Has thanked: 366 times
- Been thanked: 1322 times
Re: Tips & Tricks
You're welcome.
Added more themes to "Miscellaneous" and this is the new link,
http://www.mediafire.com/?2b2dba4hdcma4
New link for Regional, http://www.mediafire.com/?8h4fl86vl3qs5
New link for Stateside, http://www.mediafire.com/?tu698rr5xfekf
New link for US Territories, http://www.mediafire.com/?g99ymqcoqzbsx
Added more themes to "Miscellaneous" and this is the new link,
http://www.mediafire.com/?2b2dba4hdcma4
New link for Regional, http://www.mediafire.com/?8h4fl86vl3qs5
New link for Stateside, http://www.mediafire.com/?tu698rr5xfekf
New link for US Territories, http://www.mediafire.com/?g99ymqcoqzbsx
- No Card sharing discussion allowed on this forum.
- Note: Viewing Pay TV without a valid subscription is illegal.
- All the files available here are kept for experimental and educational purpose only.
- Note: Viewing Pay TV without a valid subscription is illegal.
- All the files available here are kept for experimental and educational purpose only.
-
Gohel Manish
- Posts: 6503
- Joined: Fri Oct 23, 2020 10:32 am
- Has thanked: 366 times
- Been thanked: 1322 times
Re: Tips & Tricks
How To Prevent Users To Shut Down Windows Computers which are used by several people should have different user accounts or user group for privacy of work. It is also recommended that the admin should not allow the full access to all the other users. If you are the administrator of such computer with Windows operating system and want to prevent some specific user or group to shut down the computer, can follow this tutorial and block your users from shutting down your PC. The concern may be done through editing the Local Security Policy. 1. To open the Local Security Policy type secpol.msc at Windows 7 start menu search box. If you are in Windows XP then press Win + R and type “secpol.msc” and hit Enter. 2. At the left pane of the Local Security Policy editor, expand Local Policies and then select User Rights Assignments. All the policies will be listed at the right pane. 3. In that list, find out Shut down the system and double click on it. It will open the Shut down the system Properties window. Preventing the user to shut down the computer 4. Head to Local Security Setting tab and select the user from the list whom you prevent to shut down the computer then select Remove. 5. Click on Apply and then OK. Now the specified use won’t be able to shut down your computer.
- No Card sharing discussion allowed on this forum.
- Note: Viewing Pay TV without a valid subscription is illegal.
- All the files available here are kept for experimental and educational purpose only.
- Note: Viewing Pay TV without a valid subscription is illegal.
- All the files available here are kept for experimental and educational purpose only.
-
Gohel Manish
- Posts: 6503
- Joined: Fri Oct 23, 2020 10:32 am
- Has thanked: 366 times
- Been thanked: 1322 times
Re: Tips & Tricks
*Microsoft PowerPoint Shortkeys*
============================
*Ctrl + A*=Selects all objects, slides or text
*Ctrl + B*=Applies or removes bold formatting
*Ctrl + C*=Copies selected text or graphics
*Ctrl + D*=Duplicates a marked object
*Ctrl + E*=Center aligns a paragraph
*Ctrl + F*=Opens the Navigation task pane. (to search in a document)
*Ctrl + G*=Groups shapes, pictures, and WordArt objects
*Ctrl + H*=Replaces text, specific formatting, and special items
*Ctrl + I*=Applies or removes italic formatting
*Ctrl + J*=Justified a paragraph
*Ctrl + K*=Inserts a hyperlink
*Ctrl + L*=Left aligns a paragraph
*Ctrl + M*=Inserts a new slide
*Ctrl + N*=Builds a new presentation
*Ctrl + O*=Open Documents
*Ctrl + P*=Prints the current presentation
*Ctrl + R*=Right aligns a paragraph
*Ctrl + S*=Save a Document
*Ctrl + T*=Opens the Font dialog box to change the formatting of characters
*Ctrl + U*=Applies or removes underlining
*Ctrl + V*=Pastes cut or copied object or text
*Ctrl + W*=Closes the current presentation
*Ctrl + X*=Cuts the selected text, graphics
*Ctrl + Y*=Redoes an action
*Ctrl + Z*=Undoes an action
- No Card sharing discussion allowed on this forum.
- Note: Viewing Pay TV without a valid subscription is illegal.
- All the files available here are kept for experimental and educational purpose only.
- Note: Viewing Pay TV without a valid subscription is illegal.
- All the files available here are kept for experimental and educational purpose only.